 Viral Swipe File
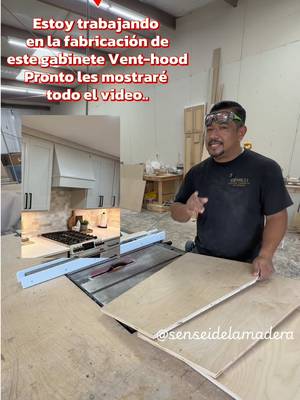

Mira este truco para hacer cortes 45
Why it beat its usual
39.6xthe views @senseidelamadera usually gets
319K views
- This video319K
- Usual views8K
- DIY medianbelow the median viral factor of the 274 DIY videos in the library (median 102x).
- Step-by-Step Tutorial medianbelow the median viral factor of the 682 Step-by-Step Tutorial videos in the library (median 108x).
- Views against the DIY nichebelow the median of the 274 DIY videos in the library (median 639,020).
- Engagement against the DIY niche6.0%, above the DIY median of 3.7%.
- Engagement
- 6.05%
How it's built
- Step-by-Step Tutorial
- How to hook
- Demo
The hook promises to teach something useful, built to keep the viewer for the steps. Built as Demo: the product shown in use, doing what it does. A creator speaks as themselves, built to read like a post from someone the viewer follows. It presses on curiosity: wanting to know what happens or how. The tone is educational.
It is pitched at viewers who know solutions exist, so it names the kind of solution, not this one.
- Hook on screen
- “Mira este truco para hacer cortes 45”
- First words said
- “How are we going to make the 45-degree cuts on this angled piece?”
What's said
3:27 · SpanishHow are we going to make the 45-degree cuts on this angled piece? I’m going to show you how. I’ve already shown you this in other videos where I got a lot of criticism, and now a lot of people are doing it, and that makes me happy, because that’s why I shared this idea, and I know I’m not the only
one who knows it. But the best way to make 45-degree cuts is this method I’m about to show you. Because imagine this: I need to make a 45-degree cut right here. If I tilt my blade to make a 45-degree cut, I’d have to make a guide a special one that would carry the whole cut so I could do it like this, at 45 degrees, because usually people measure, tilt the blade, and cut the 45-degree angle on the piece. Then, if you need a different measurement, you move the guide, and make the other cut you need.
So how would we do it on an angle like this? How would we do it? I couldn’t move the guide, because I need the cut here, and this isn’t straight. Maybe I could come up with an angled guide, and that would be a good option, and run the 45-degree cut like this. But I’m going to show you another way, easier, where you don’t have to move the guide. You don’t have to move the reference point. I’ve shown this in other videos, but for everyone who just started following me, so you can learn it and use it on your projects, look, I’m going to show you.
We’re going to use this piece of wood that has this notch, which I already made earlier with the blade. We’re going to tilt the blade, obviously. Once our blade is at 45 degrees, we set a strip of wood like this. I made this notch ahead of time. I put it here, lowered the blade, lined up the guide, and then raised the blade, and that’s how I got the notch you see here. Now we’re going to set it up like this. I put on some clamps.
The goal with this type of cut is for the blade to be hidden in the strip of wood, so you can run your 45-degree cut from any point, without having to keep moving the guide. Here you can run your 45-degree cut at any length. I mean, it can be 20, 30, 15, 10. You run your 45-degree cut in one pass, and you don’t have to keep moving it. On a piece with an angle like this, it’s even easier to run the 45-degree cut. Watch how we’re going to do it now.
First we’re going to do a test cut. Here it’s taking a little too much material, so I’m going to move the guide a bit inward, so the blade doesn’t take so much and the 45-degree cut lands right on the line. The 45-degree cut. Look, the 45-degree cut is exactly on the line where I want it. And with this reference point, I can make all the cuts to the same measurement. Now I’m going to show you. The top cap, we’re going to cut its 45-degree angle.
The first cut is done. Exactly—45-degree cuts. Even in cases like this with small pieces, we can make the cuts too. There you go—we’ve got the front cap with its two cuts. Now we’re going to do these two for the corners. This is where it’s going to be easier to use this type of guide to make the cut, because I won’t need to move my guide. I can run it straight along this same edge of the wood. Look, the first cut is done.
Now we’re going to do this small one. Look, here are the cuts: 45-degree cuts on the angled side and on the straight side. See how easy it is this way? Now we do the other one. Now we’ve got our two side pieces with their cuts, the cap, and the front piece. Now we’re going to start assembling it.
The words behind 39.6x its usual
Make your own
“Mira este truco para hacer cortes 45”
Same format: Step-by-Step Tutorial
Highest viral factor first · All
 373KxHere's how to have the best summer.
 107KxThis is the BEST summer idea!!!
 43KxTutorial on how I created these pictures with The Grinch
 17Kxhow do I make an acorn squash easier to cut
 16KxMy FAVORITE cooking hack is this app 🙌🏼
 16KxPlease don't make the same mistake I did.
 15KxThis Tumeric All In One Is shockingly good🙌🏾
 14KxDon't they use this for corn?
 7,589xHow to make $5k a month using AI
 7,216xDrawer slipping out or getting stuck
 6,216xDo you know what grows in your Ice Machine?
 5,130xKim Kardashian's Chia Seed Pudding
Same niche: DIY
Highest viral factor first · All
 10Kxpov: amas las manualidades pero creiste que ya no podias encontrar…
 9,389x20 años haciendo manualidades y RECIEN me entero de esto?????
 8,709xpov: you found a shower head that literally feels like it's giving…
 8,386xCHICAS!! fans de las manualidades MIREN ESTOOO
 7,372xCan’t fool me 😏
 6,083xMe explaining to the mechanic what's wrong with my car
 4,797xJust another valve replacement on a fullish water tank.
 4,551xMIGHT TAKE A BIT
 4,402xLove it, or hate it?
 4,389xNow you know what’s inside 🤯
 4,368xCHICAS!! que hagan crochet MIREN ESTOO 🧶
 3,990xMAJOR SCRUB DADDY BUNDLE BOX SALE
About this video
39.6x: about 39.6 times the views @senseidelamadera usually gets. Viral factor divides a video's views by its account's usual views, so it measures how far the video beat its creator's normal reach, whatever the size of the account. 6.0% engagement rate. 13,301 likes, 293 comments, 1,441 shares, 4,311 saves. Filed under DIY and Step-by-Step Tutorial.